
Mastering JavaScript Event Handlers: Empowering Interactivity in Web Development
In this article, we will look at JavaScript Event Handlers and how to use it to improve interactivity for users when browsing websites.

In the realm of web development, interactivity plays a vital role in engaging users and creating dynamic user experiences. JavaScript, being the go-to language for client-side scripting, provides developers with a powerful mechanism known as event handling. Event handlers allow developers to respond to user actions or system events, unleashing the full potential of interactivity. In this article, we will explore the world of JavaScript event handlers, learn how they work, and discover their myriad applications in web development.
Understanding Event Handlers
In JavaScript, an event is an action or occurrence that takes place within the browser window, such as a mouse click, keyboard press, or page load. Event handlers, also referred to as event listeners, are functions that are executed in response to specific events. They provide a way to bind actions to events, enabling developers to trigger custom code when events occur.
Event handlers follow a simple pattern: an event occurs, the handler is triggered, and the associated code is executed. JavaScript leverages the Document Object Model (DOM) to interact with HTML elements and attach event handlers to them. By using event handlers effectively, developers can create interactive web pages that respond dynamically to user input.
Basic Event Handling Syntax
To attach an event handler to an HTML element, you need to select the element using JavaScript and assign the handler function to the desired event property. Here's a basic syntax example:
const element = document.getElementById('myElement'); element.addEventListener('click', function() { // Code to be executed when the 'click' event occurs });In the above example, we select an element with the ID 'myElement' and attach a click event listener to it. When the user clicks on that element, the anonymous function inside the handler is executed.
Common Event Types and Use Cases
JavaScript offers a wide range of event types that developers can leverage to build interactive applications. Here are some commonly used events and their applications:
Click Event: The click event occurs when the user clicks on an element. It is widely used to handle button clicks, navigation menus, and interactive elements like sliders or carousels.
Keydown/Keypress/Keyup Events: These events are used to capture keyboard input. They allow developers to implement keyboard shortcuts, form validation, or real-time search functionality.
Mouseover/Mouseout Events: These events are triggered when the mouse pointer enters or leaves an element. They are useful for creating tooltips, dropdown menus, or hover effects.
Submit Event: The submit event occurs when a form is submitted. It enables developers to validate form inputs, perform AJAX requests, or trigger form-specific actions.
Load/Unload Events: These events are triggered when a web page finishes loading or unloading. They can be used to initialize components, fetch data, or handle cleanup tasks.
Code Example
Here is the reference HTML code which the JS code use as DOM reference:
<!DOCTYPE html>
<html>
<head>
  <title>Button Example</title>
  <script>
  <!-- JavaScript code can be placed here -->
  </script>
</head>
<body>
  <button id="myButton">Click Me</button>
  <script>
  <!-- or here -->
  </script>
</body>
</html>
Here's an example of JavaScript code that demonstrates how to create a click event handler:
// Get the element on which the click event will be handled
const button = document.getElementById('myButton');

// Define the event handler function
function handleClick(event) {
  console.log('Button clicked!');
  // Additional code to be executed when the button is clicked
}

// Attach the event listener to the button
button.addEventListener('click', handleClick);
In the above code:
The
getElementByIdmethod is used to select the HTML element with the ID'myButton'. You would replace'myButton'with the ID of the element you want to handle the click event on.The
handleClickfunction is defined as the event handler. Inside this function, you can include the code that should be executed when the button is clicked. In this example, it logs a message to the console.The
addEventListenermethod is used to attach the event listener to the button element. It takes two arguments: the event type ('click'in this case) and the event handler function (handleClick).
When the button is clicked, the handleClick function will be executed, and the message "Button clicked!" will be logged to the console. You can replace the console.log statement with any desired code to perform specific actions when the button is clicked.
Advanced Event Handling Techniques
JavaScript event handling goes beyond basic event binding. It offers several advanced techniques to enhance interactivity and application responsiveness:
Event Delegation
Instead of attaching event handlers to individual elements, event delegation involves attaching a single handler to a parent element. The event propagates from the child elements to the parent, allowing dynamic handling of events for current and future elements. This technique improves performance and simplifies code maintenance.
Here is the reference HTML code which the JS code use as DOM reference:
<!DOCTYPE html>
<html>
<head>
  <title>Event Delegation Example</title>
  <script>
  <!-- JavaScript code can be placed here -->
  </script>
</head>
<body>
  <div id="parent">
    <button>Button 1</button>
    <button>Button 2</button>
    <button>Button 3</button>
  </div>
  <script>
  <!-- or here -->
  </script>
</body>
</html>
Here's an example of JavaScript code that demonstrates event delegation using the concept of attaching a single event handler to a parent element:
// Get the parent element to which the event handler will be attached
const parentElement = document.getElementById('parent');

// Define the event handler function
function handleClick(event) {
  if (event.target.matches('button')) {
    console.log('Button clicked!');
    // Additional code to be executed when a button within the parent element is clicked
  }
}

// Attach the event listener to the parent element
parentElement.addEventListener('click', handleClick);
In the above code:
The
getElementByIdmethod is used to select the HTML element with the ID'parent'. You would replace'parent'with the ID of the parent element to which you want to attach the event handler.The
handleClickfunction is defined as the event handler. It checks if theevent.target(the element that triggered the event) matches the'button'selector using thematchesmethod. This ensures that the code inside theifstatement is executed only when a button within the parent element is clicked.The
addEventListenermethod is used to attach the event listener to the parent element. It takes two arguments: the event type ('click'in this case) and the event handler function (handleClick).
By attaching the event listener to the parent element, you can handle click events on any button within the parent element, even if the buttons are dynamically added or removed. This approach improves performance and allows for dynamic event handling without explicitly attaching event listeners to each individual button.
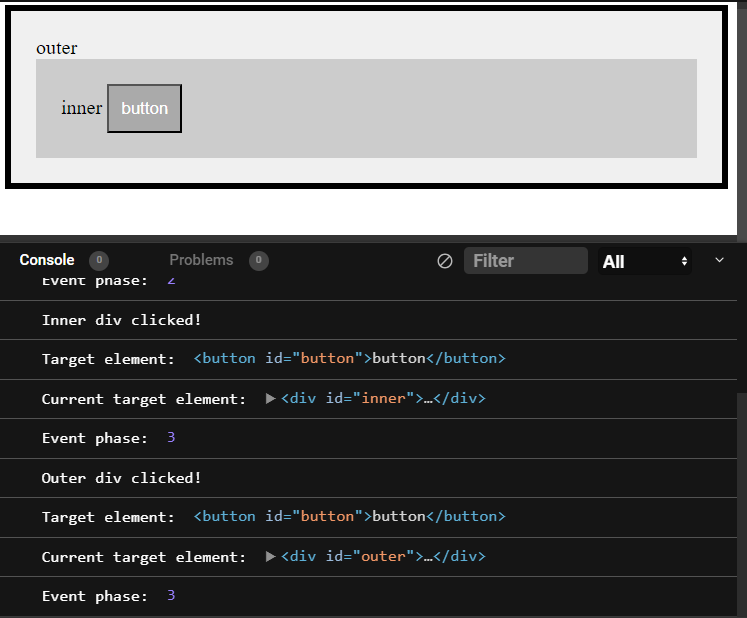
Event Bubbling and Capturing
Events in JavaScript follow the concept of event propagation. By default, events bubble up from the target element to its ancestors. Event capturing, on the other hand, triggers events from the topmost ancestor down to the target element. Understanding event propagation helps in controlling event flow and preventing unwanted event handling.
The code example for event bubbling is too large to include in this article, we will explore this topic in a separate article.
Removing Event Listeners
To avoid memory leaks and unnecessary event handling, it's essential to remove event listeners when they are no longer needed. JavaScript provides methods like removeEventListener to detach event handlers from elements.
Here is the reference HTML code which the JS code use as DOM reference:
<!DOCTYPE html>
<html>
<head>
  <title>Button Example</title>
  <script>
  <!-- JavaScript code can be placed here -->
  </script>
</head>
<body>
  <button id="myButton">Click Me</button>
  <script>
  <!-- or here -->
  </script>
</body>
</html>
Here's an example of JavaScript code that demonstrates how to remove an event listener:
// Get the element for which the event listener is to be removed
const button = document.getElementById('myButton');

// Define the event handler function
function handleClick(event) {
  console.log('Button clicked!');
}

// Attach the event listener to the button
button.addEventListener('click', handleClick);

// Remove the event listener
button.removeEventListener('click', handleClick);
In the above code:
The
getElementByIdmethod is used to select the HTML element with the ID'myButton'. Replace'myButton'with the ID of the element from which you want to remove the event listener.The
handleClickfunction is defined as the event handler.The
addEventListenermethod is used to attach the event listener to the button element. It takes two arguments: the event type ('click'in this case) and the event handler function (handleClick).The
removeEventListenermethod is used to remove the event listener from the button element. It takes the same two arguments asaddEventListener: the event type ('click') and the event handler function (handleClick).
By calling removeEventListener with the appropriate event type and handler function, you can remove the event listener that was previously attached to the button element. This ensures that the event handler function will no longer be executed when the button is clicked.
Conclusion
In conclusion, JavaScript event handlers serve as an essential component in the development of interactive and captivating web applications. By harnessing the capabilities of events, developers gain the ability to effectively respond to user actions, initiate desired actions, validate input, and construct dynamic user interfaces. Acquiring a solid understanding of event handling fundamentals, along with exploring advanced techniques such as event delegation and propagation, empowers developers to create intuitive and highly responsive applications that truly captivate and delight users. By fully embracing the vast possibilities offered by JavaScript event handlers, developers unlock the true potential of web interactivity, ushering in a new era of engaging and immersive online experiences.